|
What happened:
In our next experiment, we were shown certain
another set of circuit diagrams. We were asked to add these new upgrades
to the circuit we had already made (which was made successfully, and impressively
done…). As seen in the circuit diagram, we made use of the following materials:
(Materials)
555 Experimental Circuit (from Lab 1) – need I explain? Just
look for our last lab report on this. Well, it is actually a circuit containing
LED’s, a 555 IC, a capacitor, a potentiometer (for varying the amount of
current passing), resistors, and tons of wires. When a power source is
supplied, the LED’s Blink alternately in a seemingly hypnotizing manner…
7442 IC and 7490 IC – an integrated circuit whose purpose is
further discussed later. The definition of an Integrated Circuit (IC) however,
is that an Integrated Circuit, tiny electronic circuit used to perform
a specific electronic function, such as amplification; it is usually combined
with other components to form a more complex system.
Bread board – a non-conductive board on which electric components
are mounted and electrically connected by thin strips of metal. It has
strategically placed linking holes with metal connections underneath for
easy circuit making.
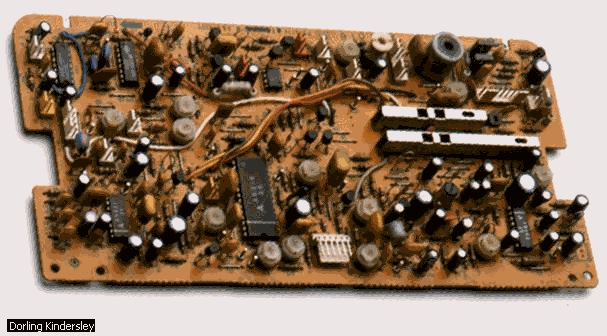
This circuit board
illustrates the complexity of the modern radio receiver. The six black
rectangular components are the Integrated Circuits (ICs) which contain
hundreds of transistors. The remaining components are resistors (small,
flat, round objects), capacitors (tall, black cylinders), and inductors
(coils of wire). Newer circuits have fewer parts, often only one IC and
a few resistors. These improvements are due to the development of more
advanced ICs and the shift from LC (inductor-capacitor) tuning to PLL (phase-locked
loop) tuning. The latter, in addition to providing a digital display of
the frequency, requires no discrete components.
(MORE!!!) Insulated copper wires – low cost conducting devices covered
with low cost nonconductive material. Insulation was provided to provide
accidental wire connections that might cause an error in the experiment
(breakage of high cost materials, wrong outputs, short circuits, dead crisp
stupid students, etc.)
(MORE!!!) LED’s – A Light-Emitting Diode (LED) is a device
that emits visible light or infrared radiation when an electric current
passes through it. More LED’s indicate a very familiar end-product…more
blinking, dazzling lights for Christmas!
After the materials have been prepared, we did
the experiment in a step-by-step process so that everyone can follow with
minimum confusion. We were to do these steps:
(Procedure/Observation)
-
The first step was to follow the first figure (figure 1). Looks familiar
eh…well, it’s actually the diagram of our finished experiment from Lab
1! Aww…how nostalgic…

-
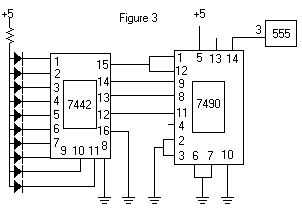
The second step (figure 2) was to make another set of circuits using the
new 7490 and 7442. Note: the figure may look simple, but the actual circuit
looks hell bad. The roots of the unappealing image were the wires…as always.
Well at least it gave a rough, tough look.

-
The next step was to put the 3 pin of the 555 to a pin 14 in the 7490.
We then observe what happens to the LED’s installed with the upgraded circuit.
The installment of the additional circuits though did not overrun the purpose
of the 555 as well as the other parts of the original circuit. For example,
the potentiometer still has a vital role in speeding up or slowing down
of the LED’s effects (blinking).
After doing the steps, we were asked to answer
the following questions:
(Questions)
Part A - Describe what you saw in this experiment.
Part B - Operating
the 7490 counter.
-
How did you connect the input pins 14 and 1?
-
Where did you connect them? Why?
-
Which are the output pins? Where did you connect them?
-
What are the functions of pins 2 and 3?
-
What are the functions of pins 6 and 7?
-
Draw a table that expresses the relationship of the output pins as the
7490 counts from "0" to "9".
Part C - Operating
the 7442 decoder.
a. What did you see when you connected the 7442 to the 7490?
b. How did you connect the pins of the 7442 to those of the 7490?
c. Why did you connect LED's to the output pins of the 7442?
With the help of our observations during our experiment
and some research, our great group was able to devise the following answers:

A really big decoder!
(Answers)
PART A: ----------------Observation
Describe what you saw in this experiment.
Aha! The storytelling part! I believe I’m going to like this…
After all resources were exhausted (teacher’s time, money, effort)
our great group has finally seen the outcome of such an ominous experiment
(ominous because we had to do it for 5 times, which led us to a conclusion
that our breadboard is cursed…probably by the last failing student who
used it). Alas! There where ten blinking lights! Finally we have created
something that looks more advanced, more fitting to our ages, than the
last experiment!
As far as we can recall, there were twelve blinking lights: two from
the old 555 experiment which are blinking alternately and ten from the
new one that are blinking...wait a minute…look... its something new! The
ten LED’s are blinking one by one! In addition, the LED’s somewhat complete
a cycle first, allowing everything to blink at an equal amount of times!
It is as if they were disciplined by the new IC’s to blink in a systematic
way! This inspired us to further investigation…spectacular!
PART B: ------------------------Counter
7490.html">Operating
the 7490 counter.
-
How did you connect the input pins 14 and 1?
Pin 1 is connected to pin 12 and then to the 15th pin of
the 7442. Pin 14 is connected to the 3rd pin of the 555 timer
-
Where did you connect them? Why?
Pins 1 and 14 are so called input pins: it is where we place in the
information (an on and an off) for the IC to process. Pin 1(which is an
input B pin) is connected to pin twelve (which is Output A) in order to
maximize the amount of counts that the 7490 can handle (that is 0 to 9).
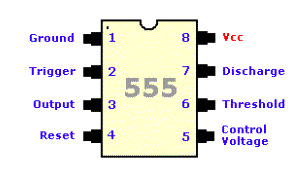
Pin 14 (which is input A) is connected to pin 3 of the 555 IC. We can see
below that the 3rd pin of the 555 serves as its output. It is
clear that we are merely connecting an output of a certain IC to an input
to another IC for further processing. In our case, the output of the 555
serves as a signal for the 7490 to make a count (and give certain outputs
as well) whenever the right trigger is made.
-
Which are the output pins? Where did you connect them?

The output pins are the pins 12 (output A), 9 (output B), 8 (output
C), and 11 (output D). The output pins are then connected to the inputs
of the 7442 decoder.
-
What are the functions of pins 2 and 3?
The functions of pins 2 and 3 are as reset switches. Once triggered,
the 7490 counter resets back to zero. However, since we are to use the
maximum number of counts the 7490 can handle, there is no need for resetting,
since the count just loops back to the first number. This is why the two
pins are connected to the ground
-
What are the functions of pins 6 and 7?
The same as that of pins 2 and 3’s purpose, except that it resets to
the 9 value. It is also not needed in this experiment because we are counting
up to the 7490’s limit anyway.
-
Draw a table that expresses the relationship of the output pins as the
7490 counts from "0" to "9".
SURE….
|
7490 Counter
|
Output A
|
Output B
|
Output C
|
Output D
|
|
0
|
0
|
0
|
0
|
0
|
|
1
|
0
|
0
|
0
|
1
|
|
2
|
0
|
0
|
1
|
0
|
|
3
|
0
|
0
|
1
|
1
|
|
4
|
0
|
1
|
0
|
0
|
|
5
|
0
|
1
|
0
|
1
|
|
6
|
0
|
1
|
1
|
0
|
|
7
|
0
|
1
|
1
|
1
|
|
8
|
1
|
0
|
0
|
0
|
|
9
|
1
|
0
|
0
|
1
|
Wow…they look pretty familiar…my eyes are feeling
binary…hehehe
Obviously, these are binary values…soon to be recognized by our trusty
7442 decoder…

PART C: ------------------------Decoder
Operating
the 7442 decoder.
a. What did you see when you connected the 7442 to the 7490?
There was definitely an immediate effect on the behavior of the lights
that blinked. The LED’s blinked uniformly, meaning that they turn on and
off in a certain cycle that everyone gets a "share". Only one LED blinks
at a certain time. It is almost unnoticeable too that these changes occur
when logic 1 is present.
b. How did you connect the pins of the 7442 to those of the 7490?
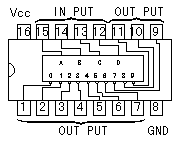
As usual, the outputs of the 7490 were then connected to the input pins
of the 7442, each corresponding to the same input output class (meaning
output A of the 7490 is connected to input A of the 7442, and so on and
so forth).
c. Why did you connect LED's to the output pins of the 7442?
The most obvious manner of knowing a certain output is by checking if a
certain device works on it or not. With the help of the LED’s we were able
to determine when and where the 7442 provides an output, given the input
handled by the 7490. What it means is that the corresponding pins somewhat
acts in a way that only one (pin) is activated at a given time, thus explaining
the behavior of its blinking when we first observed it.

Along with the answers, we were also able to comment
on what happened to our experiment:
(Comments)
- Actually, we can already see the purpose of these IC’s by their name
itself! The 7490 decade counter serves as a 0 to 9 counter, providing a
binary equivalent of the count as an output. Once a signal is given by
the 555, the counter outputs a binary equivalent of it (on the first signal,
0 or 0000 is outputted, next 0001 and so on and so forth.) which in turn
is taken by the 7442, or decoder as input. The decoder’s purpose somewhat
is the reverse of the 7490: it takes the binary equivalent of a certain
number the 7490 produces, and then outputs only 1 of its pins (it has 10
pins as outputs…coincidence? I think not…) that correspond to that value!
Simple!

How many decoders can you see?
- a decoder and counter is somewhat a lost and found booth, you give
certain descriptions to an object you found like size, the place
it was lost, the color, special characteristics, etc. This is when you
somewhat put a ‘‘count’’ on the object that was surrendered. However, when
you’ve lost something, you go to the booth and give specific descriptions
and proofs concerning the object. When there is a match fount that has
been "counted"; the lost and found booth gives it to you. Most of the objects
lost are very unique (like a bag has a name of the owner, etc) meaning
that there is only a specific owner linked to an object. Thanks to the
7490 and the 7443, what is lost…is then found! Hehehehe
- did you know that the 7490 counter is also a known as a decade counter?
It means that its purpose really was to count something like a decade or
ten units (0-9, that is)! Splendid!
- Still, we would not be able to study the behavior of these new IC’s
without the help of an often neglected device in the circuit: the capacitor.
In fact, we may even call it the crudest, yet most vital part of the circuit
as it is the "information giver". Without it, we can only have a straight
logic one or a straight logic zero or we can do it the hard way... tsk,
tsk…
- I’ll explain this to a twelve year old:
Well the 7490 is somewhat the doctor who helped your mom in giving
birth to you. Aside from that, he checks in the date that you were born
and writes it in a piece of paper.
Apparently your mom can’t give birth to a new younger sister that
fast, so another year must still pass before you have one, and another
year to another younger child. Also at these times, the doctor gives them
a different piece of paper, giving the date when they were bon too.
Your dad has a tradition he learned from his parents. He gives a
very special gift when one of his siblings reaches fifteen! He then is
like a 7442. He looks at the papers that the doctor gave a long time ago,
makes the necessary calculations to check which child is fifteen already.
Since you are the oldest, and going fifteen, you will have a special gift
very soon! Next is your younger sister, then the youngest.
It has become a tradition, so whenever you’ll have a family, follow
it. Its nice to be a helpful 7490 and a caring 7442!
|